Resolution and Color Settings
The size of your screen may be changed depending on your display settings. MODSIM starts up with a window sized according to the size of your screen in pixels. It is possible to run MODSIM in screens as small as 640 x 480 pixels. However, during the course, we will be delivering viewlets, ScreenCam and PowerPoint type presentations, and you will want to see the entire MODSIM window inside a browser window for example. It is therefore required that you set your screen size to at least 800 by 600 pixels, and a screen size of 1024 x 768 pixels is recommended. Also, the presentations and viewlets are prepared at 256 colors, so you should set the color mode at at least 256 colors. High Color (16 bit) is better and if your video card have this mode available, you should use it. True color, 24 bit or 32 bit, also work well, and are in fact your best choice. However, be aware that older versions of Modsim do not display graphics in true color modes.
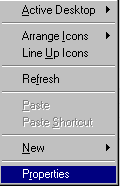
Step 1: To set your screen, right click on your desktop background. This should open the desktop settings window.
Step 2: Choose Properties (or type r in your keyboard). This will open the Display Properties window. Look for the Settings tab near the top of this window.
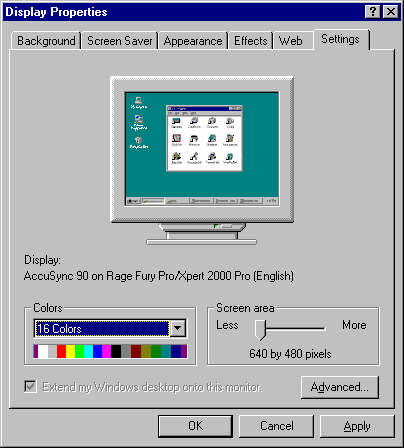
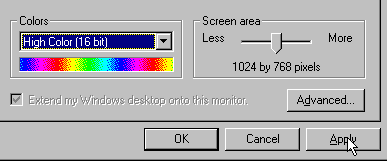
Step 3: Click on the Settings tab.This will open the Display Settings. Look for Colors and Screen area in this window.
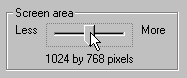
Step 4: In the Screen area click and drag the slider towards "More" and release the left mouse button when it shows the desired screen area (1024 by 768 recommended):
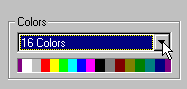
Step 5: In the Colors section open the list box by clicking in the down arrow to display the color modes available in your system.
Step 6: Choose High Color (16 bit) as recommended or 256 Colors if High Color mode is not available. Click on Apply to change to the new size and color settings:
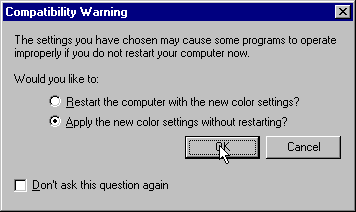
Step 7: At this point the behavior is depending on the version of windows you are running and on your configuration. On most systems running windows 98 SE, a dialog is open to query the user if the system should be restarted or the new settings should be implemented without restarting. If you can change the settings without restarting the system, you will have a chance to verify that the new video settings work with your monitor and video card.If all you see is a garbled screen after you click on OK, do nothing, just wait for 15 seconds and your old settings will be restored automatically.
Step 8: If changes are successful, you will see another dialog window in the reseized desktop. Click on Yes to keep the new settings.

Important: In case you have trouble with this procedure, i.e. your computer boots but Windows does not display properly and all you see is a garbled screen, reboot and press the F8 key before Windows loads. This is after the POST operation, when you see Loading Windows 9x in your console screen. You will be given a number of choices before Windows starts. Choose Safe Mode, and this will start Windows in VGA mode. Change your display settings to settings you know do work in your machine, and reboot.